Showing posts with label 8th Grade. Show all posts

Thursday, August 12, 2010

8th Grade Ceramics

I majored in clay back when I got my BFA and it is my first love! When I had the opportunity to teach clay during my student teaching, I was thrilled! the 8th graders first learned basic slab building techniques as well as modeling and relief sculpting when they created garden leaf faces and 'green men'. After becoming comfortable with handling clay, they moved on to making gargoyles, a really fun lesson for all. They formed their clay around an armature, created expressions while modeling faces and used a finer clay body to achieve better detail. Some of the almost finished products can be seen waiting to be fired. Unfortunately I don't have pictures of the finished gargoyles, but they painted them after they were fired with a gray stone like acrylic paint.


Thursday, May 27, 2010

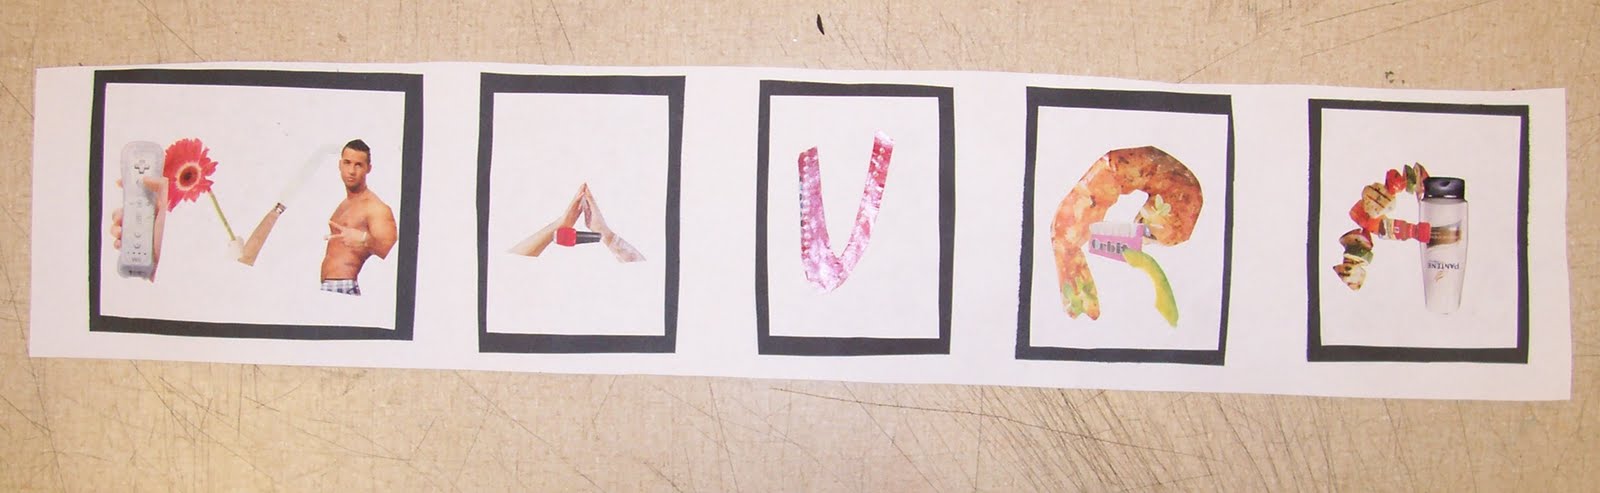
8th grade name collages

8th grade just finished these name collages. I was inspired to do this lesson after I saw some work of a local photographer (wish I knew her name) who takes pictures of everyday things and somehow, sees a letter in them. Pictures could be a close up of a flower, but it looks like the letter Y. She then puts these letters together to make words which could be inspirational, a persons name or any other number of things. I loved her artwork, so I adapted her idea so the 8th graders could create their names by using pictures found in magazines. The results, I think, speak for themselves!


Along with having to look at objects in a new way, students were required to neatly mount the letters. This took time, measuring and attention to detail. I love some of the whimsy that came out of this project!

Tuesday, May 11, 2010

Kaleidocycles


I introduced kaleidocycles to my 6th graders on Friday. (Please see my post on kaleidocycles for links to good websites) They loved them, but here are a few tips. First, expect to have a million questions about how to fold them. And then expect to be asked again how to fold them. And again... (you get the picture)
Next, expect to give mucho individual assistance when it comes to assembling them. They don't go together in a very clear cut fashion and for those who have never folded something like this before (none of my 6th graders), it is far from intuitive. That said, it was a project that they were all interested in, and all wanted to have one due to the coolness factor. I slipped in some math and I don't even think they minded! The only other thing I wish was different, but I had no control over, was I wish I was able to print mine on cardstock and a bit larger. The printer at my school doesn't handle cardstock, unfortunately.


I do believe this lesson would be better suited for 8th grade or above, due mainly to the develoment of dexterity and visualization skills. Otherwise, still a great project.

Saturday, April 24, 2010

Sea Glass and Sea shell jewelry


My daughter asked if we could make some jewelry today.. I pulled out some of my tools and wire and an assortment of beads, sea shells, and sea glass and the results were quite nice. It got me thinking that this would be a great lesson for middle or high school aged students. My daughter is 11 and she did pretty good with some guided instruction. (I love having a daughter in 6th grade! She helps me test new lessons and gauge age appropriateness!) The tools needed are few (a pair of wire cutters and needle nose pliers, preferably smooth tipped) and the supplies are easy to come by and relatively inexpensive. I know that a bag of sea glass is under $5.00 at my local craft store and this bag will easily supply a class full of kids. I bought the wire (24 gauge) at Wal Mart and I think it was under $2.00 and 2 rolls of this will easily supply a class. Beads are pretty cheap also, and you can use most anything for the cording.

I have an assortment of pliers, but you can get away with just the 2 I mentioned for beginning projects. With very basic wire wrapping techniques, you can produce some very attractive jewelry. The skills learned include proper and safe use of tools, designing personalized pieces of jewelry, and learning about new materials. You could easily include a power point that gives some history about jewelry making, information on contemporary jewelry crafters and discuss jewelry making as an art form.

When I try this lesson with my students, I will post pictures of their creations!


Friday, April 23, 2010

Gridded Portraits

I have been teaching this lesson to my 6th graders and they are finally in the home stretch! If I had it to do it over, I would not teach this to 6th graders, but would wait perhaps for 8th or 9th grade when the students have more skills and maturity (and patience). That said, here are some of the results thus far. For those who don't know, drawing from a grid is a great way to enlarge an image and create realistic looking art work with correct proportions. I introduced this project by showing artwork by Chuck Close, the popular artist who works from a grid and creates very large, photo realistic portraits.


I started by taking the student's pictures in a carefully lit room (light coming only from one direction) Then I put each picture in Photoshop, and I adjusted the brightness/contrast, desaturated it, and reduced the number of values to 4 by using the Cutout filter. This gave the students a simplistic portrait of themselves to work from. After printing out the photos on 4 inch x 6 inch paper, each student attached a piece of acetate to the photo and created a 1/2 inch grid on top of the entire photo. Then on a piece of 8 inch x12 inch paper, they created a 1 inch grid. There was a lot of demonstration and one on one explanation on how to create a grid using a ruler (which was surprising, but a learning experience for me... I realized that 6th graders don't have a lot of practice using a ruler, so this was a great lesson to teach some basic measuring and drawing skills) Then the important thing to stress (over and over) is that the key to creating a drawing using a grid is to only look at each individual square as you are drawing. If you attempt to reacreate the image by looking at the picture as a whole, you won't achieve the same results. This by far was the most difficult obstacle for most of the students to over come, as they had never approached drawing in this way before. I will post more of the final results as the students finish, but for now, here are a few that are turning out pretty well!

Thursday, April 8, 2010

Altered Books and Found Poetry

Middle school is such a tenuous age when students are searching for identity, want to express themselves, yet find it difficult to do. This lesson is a wonderful way for middle grade students (and highschoolers as well) to find an outlet. It combines the concept of altered books with poetry, which seems to come naturally to many students this age.


The thing you need in quantity are lots of discarded books. This could be easier than you think. As I used to be a librarian, I know that many books are often discarded after they have sat in the book sale area for too long, or when the used book donations people make to the library are too musty to store. My library donated hundreds of books for this project and believe me, they had thousands more where they came from.


You could take this lesson as far as you like, but when I taught it, I only had one period (I participated in an "art day" in Bethlehem, where the students had art for an entire day, and rotated around the school to different rooms participating in many different lessons. A cool idea in itself!) Here is basically how I taught my lesson:

I showed a power point with many examples of altered books. There are so many things that you can do and I will not go into all of them here. What I focused on was how you can use the text in the book to 'find' poetry. Basically the students scanned the text for words or phrases that stood out to them. They circled or underlined these words. Then, using oil pastels, they colored in/drew pictures around these words so that only those chosen words were visible, or highlighted. The images that they drew, colors they chose etc. were related to the 'found poetry' they had highlighted. This was the lesson I taught. As I said, you could easily extend this lesson where students could keep their book as a journal, a project they work on periodically throughout the year, something they add to, subtract from, etc. I was told by many of the students that this lesson was one of their favorites of the day. This tells me that it was perfect for this age group. They came up with some pretty intense material!


k


Sunday, March 28, 2010

Mask making and identity

My 8th graders created masks as a way to explore their identity. They were given pre-made masks (paper forms) that they were then allowed to decorate/enhance /adorn/alter with whatever materials were available or materials they brought in from home. The masks were also hot glued onto a cardboard backing which they were to use as a continuation of their mask. They could leave the backing in a rectangular shape, or they could cut it to reflect the theme of their mask. They were told to think about their interests and aspects of their personality that make them who they are. Just a note, this is hard for some students and they need gentle guidance to help them discover what their likes and dislikes are. There are, of course, many mask images available on the net to help spark students imagination as well.


As an extension to this lesson, the students were required to write a poem about their mask using one of 3 different poetry styles: cinquain, acrostic or haiku. I wanted the students to write poems because as they were working on their masks, I learned things about the students that I otherwise wouldn't have known. Just viewing the finished mask, people may not know what the student's different symbolism and use of material stands for. The poems add another layer of meaning to the masks. I also found that the poetry helped the students themselves better understand what they were trying to accomplish with their masks as well. The students were required to write their final poem in calligraphy. The above picture shows a finished mask with her finished poem, an acrostic which spells BUG. As an interdisciplinary connection, this one is tops!